Cisco

Cisco ASA

Basic configuration of Cisco ASA

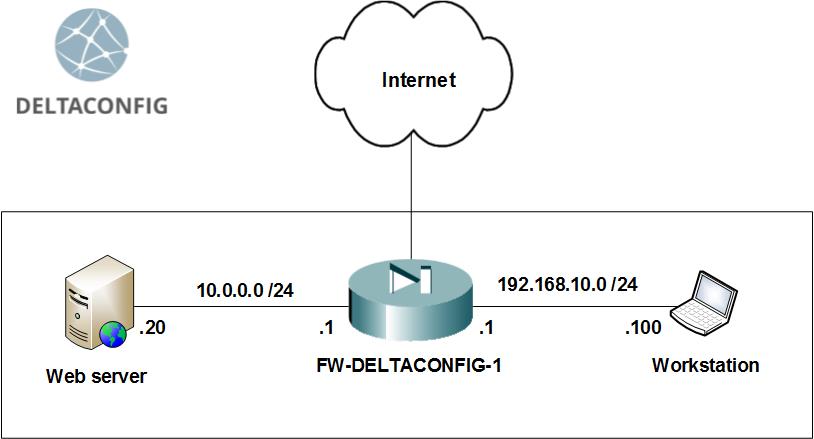
Let's look over an example of how to connect an office LAN to the Internet with using a Cisco ASA firewall. For this example, we will use the junior model of the lineup – Cisco ASA 5505. Its main distinction from the higher-end models is the 8-port integrated switch, that allows to have 8 switch ports on board(Layer 2 of OSI model) . These ports cannot have an IP address assigned to them, but if you want to create Layer 3 interfaces, you can configure a virtual interface (VLAN) and assign IP addresses there. Assigning a port to a VLAN will allow you to use an IP address for that port, just like assigning one to an interface of a router.

In this example we will use:

Our task: allow the internal LAN hosts to access the Internet through the firewall.
Read more →
Tips and Tricks

Configuring SSH on Cisco IOS

Once you start working with Cisco routers, you may wonder how you set up a SSH connection to a router. Five easy steps to do it are below.
We'll take a Cisco 881 router. Steps to set up a connection to a different router (1841, 2800, 3825, etc.) or a switch (2900, 3500, 4800, etc.) are pretty much the same, though interface configuration can be a little different. (Setting up a SSH connection to Cisco ASA firewalls is described in the article "Cisco ASA basic Internet access")
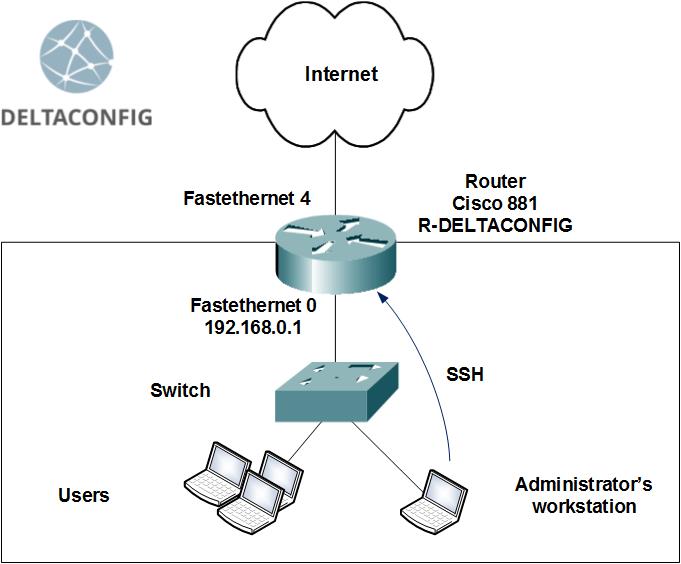
So, we have on hand

The task is to configure a secure connection to the Cisco router via SSH and provide a means of secure remote control.

Step 0. Configuring an interface

The router should have one interface, the one that is going to be used for remote control, enabled. In our case, it'll be a LAN Fastethernet 0 interface.

Read more →
Routers

Basic configuration of the Cisco router. Access to the Internet.

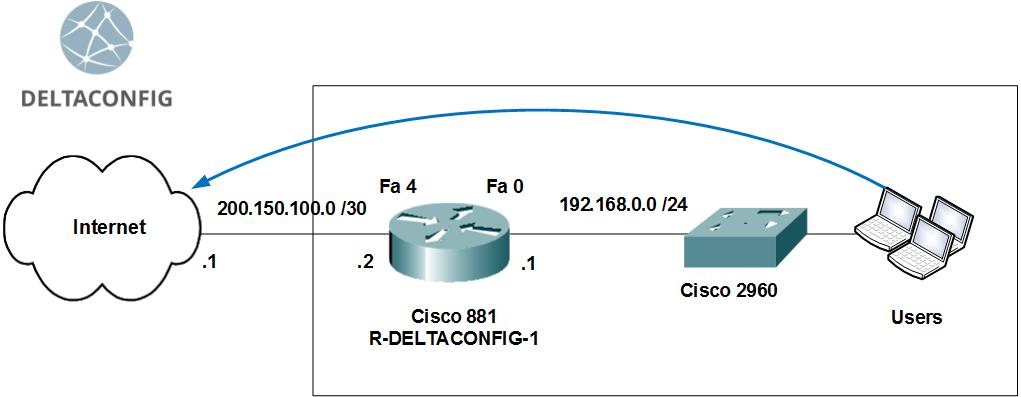
Let's see how to connect an office to the Internet using a Cisco router.
Let's take Cisco 881 for example. Commands for configuration of other routers (1841, 2800, 3825…) will be the same. They may differ only in configuration of interfaces, i.e. their names and numbers.

The scheme includes

Task: provide access for LAN computers to the Internet

Read more →
Cisco ASA

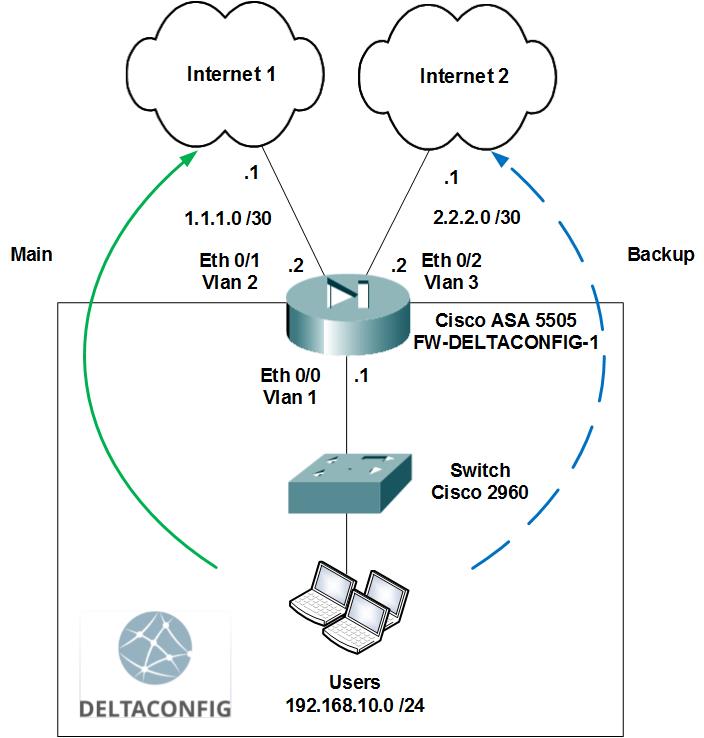
Dual WAN on Cisco ASA

This article describes how to configure Dual WAN connection on Cisco ASA. If you need to configure the same on any Cisco router like Cisco 881 then read the article "IP SLA on Cisco router"

Sooner or later, every network administrator encounters a channel going down, whether it is an ISP uplink to the Internet or a WAN circuit to some other resources. Most of the time this serves as that "a-ha" moment that forces us to think about creating some kind of a backup mechanism (too bad that we didn't think about such things in advance!). Yet, if there are two ISPs available, you have the opportunity to configure a redundant connection scheme that will help you avoid downtime.

Ideally, you would place a router, connect two ISPs to it, reserve an autonomous system with public IP addresses and configure a fully redundant connection scheme with BGP protocol (Cisco ASA series support BGP only on 5500X models and with the latest versions of IOS). However, this approach suits only large companies with enough resources, capacity, and trained personnel.

In most cases configuring a backup ISP to be used in case of main channel failure is the most adequate solution. Cisco ASA devices have the capability to monitor the availability of the primary ISP channel and switching over to the configured backup in case of its failure (when the gateway fails to respond to ICMP requests over several seconds).

Read more →
Switch

Basic configuration of Cisco 2960 switch

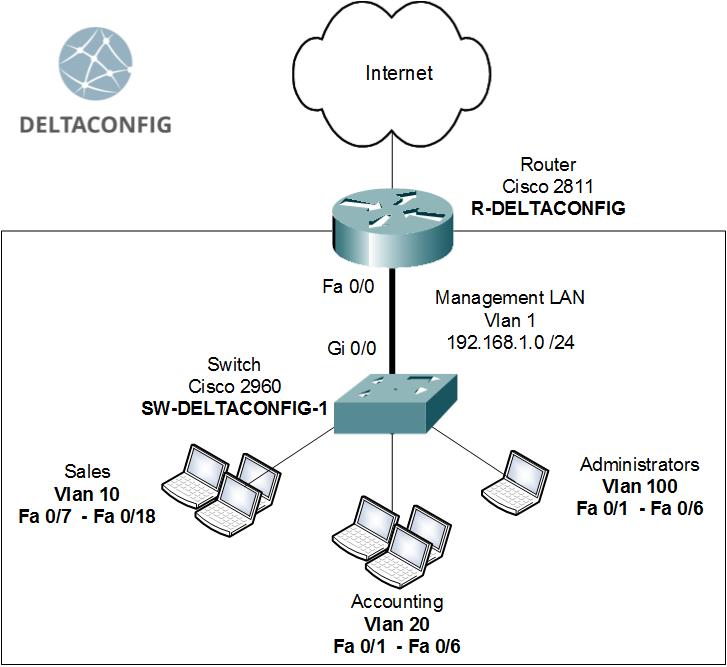
Let's consider the simplest case when you have to hook up 3 departments of a company to different logical networks (Vlans) using one access layer switch Cisco 2960 (Sometimes they are called switches of the second layer of OSI model).

For example we need to organize these networks (Vlan):

Video version of this article

Read more →
Cisco ASA

Few words about capturing packets on Cisco ASA

Cisco ASA firewalls have a useful tool for capturing and analyzing the traffic that crosses the firewall, called capture. Sometimes this is also referred to as 'traffic dump' or 'traffic sniffer'.
You only need to set two parameters to start capturing:

Step 1. Setting up target traffic

Target packets should be defined with a simple access list. For example, we are interested in capturing traffic from host 192.168.10.100. Create an access list with the following two lines, where the host address serves both as a source and a destination.

You may change 'any' in the lines above to a more specific host address or even a network, or change 'ip' to a specific protocol. For instance, to capture TCP traffic between hosts 192.168.10.100 and 1.1.1.1, use commands like these

Attention!
There are no limitations to that access list: it does not filter any traffic, and you may add as many lines as you need. However, the more diverse packets you capture, the harder it is to analyze the results. In the field, you often capture IP traffic (which includes all connections) between two specific hosts.

Read more →
Tips and Tricks

Connecting to Cisco devices

In order to start working with Cisco equipment, you first need to configure it by connecting to its CLI through the console. Let us take a look at a situation in which you have an administrator workstation and console or rollover cables available somewhere close to the equipment that you want to configure.

1) Configuring Cisco equipment with the use of a console cable

In order to configure Cisco equipment through consoling into its' CLI, you need to use the blue cable that is shipped with each Cisco device. This cable has to be connected to the COM port of the administrator's workstation on one end, and the console port of the Cisco device on the other (the interface is marked with "CONSOLE" or "CON" lettering)

Modern PCs and laptops often don't have the COM port installed. In this case, you will have to purchase a USB to COM (RS232) adapter.
I recommend using the free and simple terminal emulator Putty in order to console into your equipment (Download from the official site). After downloading it, just run the program (it does not require installation) and change the default "SSH" connection type to "Serial" in the dialog box that opens (see the screenshot below). Click "Open" to start your console session.

Read more →