Configuring L2TP on Cisco router
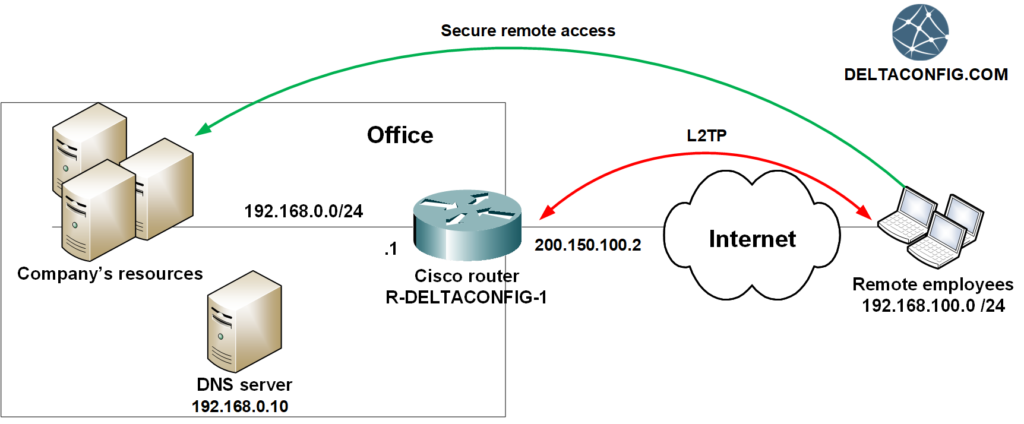
L2TP technology on Cisco routers is usually used when it is necessary to provide simple and secure remote access for company employees.
Technology benefits
- No additional hardware licenses are required. The maximum number of simultaneous user connections is limited by the capabilities of the equipment itself.
- Connection setup on the user side is performed in the built-in client in any operating system, whether it be Windows, Mac or Linux. No need to install additional software.
We will show an example of configuring L2TP on the Cisco 2911 router, however, any other model is configured in the same way.
The router was preconfigured in accordance with the guide “Basic configuration of the Cisco Router. Access to the Internet“.
Configuring L2TP on a Cisco router allows companies to save money in terms of the price of the solution, but at the same time has more restrictions than configuring other types of connections, for example, Cisco anyconnect.
- The IP address 200.150.100.2 / 30 is set on the external interface
- The IP address 192.168.0.1 / 24 is set on the internal interface
- The default gateway is set to the address of the provider and inside hosts can reach the internet
Step 1. Range of addresses for remote users
You must specify the address range that will be assigned to remote L2TP clients. For this purpose, the DHCP pool settings are best suited. Here you can specify not only the addresses themselves, but also the domain name, DNS servers and other parameters, if necessary.
In our example, this will be the network 192.168.100.0 / 24, with the first 10 addresses being excluded. Keep these addresses in reserve for technological purposes.
R-DELTACONFIG(config)#

ip dhcp excluded-address 192.168.100.1 192.168.100.10

ip dhcp pool POOL_L2TP_USERS

network 192.168.100.0 255.255.255.0

domain-name deltaconfig.local

dns-server 192.168.1.10
192.168.1.10 – internal DNS server of the company
deltaconfig.local – domain in MS Active Directory
Practice shows that some devices on MacOS do not receive the correct settings for the DNS servers specified in the DHCP pool. If you encounter such a problem, then try specifying the internal DNS servers additionally this way.
ip name-server 192.168.1.10
Step 2. Creating virtual interfaces
Сreate 2 virtual interfaces:
Interface Loopback 1 is an interface that will be used as a virtual gateway for remote workstations.
Interface Virtual-Template 1 is a virtual template for connecting remote L2TP clients to a Cisco router. links to previously set parameters will be indicated In its settings:
- virtual loopback 1 interface
- address range for remote users
- valid connection authentication protocols (MS CHAP and MS CHAP2)
R-DELTACONFIG(config)#

interface Loopback1

description --- l2tp vpn endpoint ---

ip address 192.168.100.1 255.255.255.0
interface Virtual-Template 1

ip unnumbered Loopback1

peer default ip address dhcp-pool POOL_REMOTE+L2TP_USERS

ppp encrypt mppe auto

ppp authentication ms-chap ms-chap-v2
Step 3. Configure encryption settings
To protect the transmitted data, you must specify a set of encryption parameters, as well as set a common encryption key. The key will be the same for all remote users. In addition to it, each user will be logged in with a separate login and password.
You can use other parameters, including those that are already set on your device for existing VPN connections.
Encryption options
R-DELTACONFIG(config)#

crypto isakmp policy 10

encr 3des

authentication pre-share

group 2

lifetime 3600

crypto ipsec transform-set ESP-3DES-SHA esp-3des esp-sha-hmac

mode transport
Shared key
crypto isakmp key значение_ключа address 0.0.0.0 no-xauth
Encryption policy
R-DELTACONFIG(config)#

crypto dynamic-map CRYPTO_MAP_REMOTE_USERS 10

set nat demux

set transform-set ESP-3DES-SHA

crypto map CRYPTO_MAP 100 ipsec-isakmp dynamic CRYPTO_MAP_REMOTE_USERS
Binding an encryption policy to an external interface
R-DELTACONFIG(config)#

interface GigabitEthernet0/0

description --- Link to Internet---

ip address 200.150.100.2 255.255.255.252

duplex auto

speed auto

crypto map CRYPTO_MAP
Attention!
If any other types of VPN connections are already configured on your Cisco router, then the encryption policy can already be configured and binded to the external interface. In this case, it is necessary to bind the CRYPTO_MAP_REMOTE_USERS dynamic policy to the existing crypto map under the next free number (id).
Step 4. User authorization
There are various options for user authorization. If only a few people need remote access, then accounts can be stored on the router itself in its local database.
If you need to connect a large number of users and the company has its own MS Active Directory server, then the authorization function can be transferred to this external RADIUS server.
Configuring user authorization using routers local database
R-DELTACONFIG(config)#

aaa new-model

aaa authentication ppp default local

aaa authorization network default local
You must also create an account for each user.
R-DELTACONFIG(config)#

username l2tp_fred password superstrongpassword

username l2tp_duke password verystrongpassword
Configuring user authorization using RADIUS server (MS Active Directory)
You must specify that authorization must go through a RADIUS server
R-DELTACONFIG(config)#

aaa authentication login default local

aaa authentication ppp default group radius local

aaa authorization exec default local

aaa authorization network default group radius local

aaa accounting network vpnMKac

action-type start-stop

group radius
Then specify the address of the RADIUS server and the key to access it
R-DELTACONFIG(config)#

radius server RADIUS_DELTACONFIG

address ipv4 192.168.1.20 auth-port 1645 acct-port 1646

radius-server key 0 ключ_для_сервера
192.168.1.20 – address of the RADIUS (Active Directory) server of the company.
Attention!
The corresponding settings should also be made on the RADIUS server, but their description is beyond the scope of this article. If you can’t deal with this method of connecting users on your own, we recommend choosing a method for authorizing users through a local database of the Cisco router.

Step 5. Enabling L2TP
The final step of the cisco router settings is to activate all the settings for connecting remote users via L2TP protocol.
R-DELTACONFIG(config)#

vpdn enable

vpdn session-limit 100

vpdn-group L2TP_REMOTE_USERS

accept-dialin

protocol l2tp

virtual-template 1

no l2tp tunnel authentication
Step 6. Client setup
There are hundreds of articles on setting up L2TP clients on the Internet, so it makes no sense to copy this information here. However, there is a feature due to which users often encounter a problem when connecting.
Important!
One of the most common problems with such connections is that the client loses access to the Internet while the L2TP connection to the Cisco router is working. This is due to the fact that at basic settings, the virtual gateway inside L2TP becomes more priority for the client.
In order for L2TP tunnel to transmit traffic only to the company’s resources, and access to the Internet was still carried out directly through the client’s equipment, additional settings on the client side must be performed.
For correct operation, you need
- go to the adapter settings on the “Network” tab
- open the properties of “Internet protocol Version 4 (TCP / IPv4)”
- click “Advanced”
- remove the checkbox from the option “Use the default gateway on a remote network”
If this is not done, then all traffic from clients will go through a secure tunnel, which will lead to excessive load on the router or just wont work properly.
Important!
Remember to save the configuration of all devices with the write or copy run start command. Otherwise all changes will be lost after router reboot.
This article was written by Alexey Yurchenko
I’ve tried to apply your config to router Cisco 3925 using RADIUS. It works only for PAP, not for mschapv2 because router don’t receive a user password (debug outputs), it sounds very strange.. Any idea?Thanks!